
Chocolate Caramels – Rich, Chewy & Silky-Smooth Homemade Candy
There’s something almost luxurious about biting into a chocolate caramel. The rich, chewy texture. The bold, cocoa-kissed sweetness. The way it melts slowly, leaving a deep, velvety finish. These homemade chocolate caramels are the kind of treat that feel both familiar and indulgent — like the elevated version of childhood favorites. Whether you’re gifting, holiday prepping, or simply craving something smooth and chocolatey, this recipe brings everything together in one foolproof batch. In this post, we’ll walk through the best ingredients, technique, and tips for making the best chocolate caramels right in your own kitchen. No candy shop needed.
The Story Behind My Chocolate Caramels
How a holiday mishap became a family favorite
I didn’t mean to make chocolate caramels the first time. I was aiming for classic buttery caramels, but I accidentally added cocoa powder instead of cinnamon. I panicked — but as they cooled, the aroma was incredible. Deep, dark, and just a little bit nutty. When I tasted one, it was better than the original. That mistake became the caramel that everyone now requests.
There’s something nostalgic about them — but also something elevated. The chocolate adds a richness you don’t expect in a caramel. And when you get the texture just right? Soft enough to melt slowly. Just firm enough to chew. It’s magic.
What makes chocolate caramels stand out
The main difference is obvious — cocoa or chocolate is added directly to the caramel base. But the depth of flavor it creates is what makes them shine. Cocoa cuts the sweetness slightly, making each bite feel bold, not overly sugary.
Unlike basic caramels, chocolate caramels feel grown-up. The cocoa enhances the butter and cream without overpowering them. Some versions use cocoa powder, others use chopped chocolate — either way, the result is a velvety, chewy square that tastes like hot chocolate and caramel had a baby.
How to Make Chocolate Caramels at Home
Ingredients that bring the flavor
To get that perfect chocolate caramel, you’ll need a mix of classic candy components and quality cocoa. This is one of those recipes where ingredient quality really matters — especially with the chocolate. Here’s what you’ll need:
- Heavy cream – for softness and richness
- Unsalted butter – adds structure and flavor
- Granulated sugar – for sweetness and caramelization
- Light corn syrup – keeps the mixture smooth and prevents crystallization
- Unsweetened cocoa powder or chopped dark chocolate – for bold cocoa flavor
- Pure vanilla extract – enhances both chocolate and caramel
- Fine sea salt – balances the sweetness
Using high-quality Dutch-process cocoa gives these caramels a richer color and flavor. If you prefer to use real chocolate, choose a bar that’s 60–70% cocoa and chop it finely before adding it in at the end.
Step-by-step instructions
- Prep your pan: Line an 8×8 baking dish with parchment paper and lightly butter it.
- Heat ingredients: In a heavy saucepan, combine cream, sugar, butter, corn syrup, and cocoa (if using powder). Stir gently over medium heat until melted and fully combined.
- Cook to temperature: Attach a candy thermometer and cook the mixture until it reaches 245°F (firm ball stage), without stirring once it boils.
- Add chocolate/vanilla: Remove from heat. Stir in chopped chocolate (if using instead of cocoa) and vanilla until smooth.
- Pour and cool: Quickly pour into the prepared dish, spreading evenly. Let sit at room temperature for 3–4 hours.
- Cut and wrap: Slice into squares and wrap each piece in wax paper to prevent sticking.
Chocolate Caramels – Rich, Chewy & Silky-Smooth Homemade Candy
Ingredients
Method
- Line an 8×8-inch baking pan with parchment paper and butter it well.
- In a saucepan, heat cream, cocoa powder, and butter until smooth and just simmering. Remove from heat.
- In another saucepan, combine sugar, corn syrup, and water. Cook over medium-high, swirling (not stirring) until deep golden (around 320°F).
- Slowly pour in the cocoa cream mixture while stirring. Cook until it reaches 245°F (firm-ball stage).
- Remove from heat, stir in vanilla, and pour into the prepared pan.
- Cool completely at room temp.
- Sprinkle with flake salt (optional), then cut into squares and wrap.
Variations & Texture Secrets for Chocolate Caramels
Flavor twists worth trying
Once you’ve got the base recipe down, the possibilities for chocolate caramels really open up. Here are some flavorful upgrades you can easily mix in or drizzle on for a gourmet finish:
- Espresso Chocolate Caramels: Add ½ teaspoon of instant espresso powder to enhance the depth of the cocoa flavor — it’s like mocha in candy form.
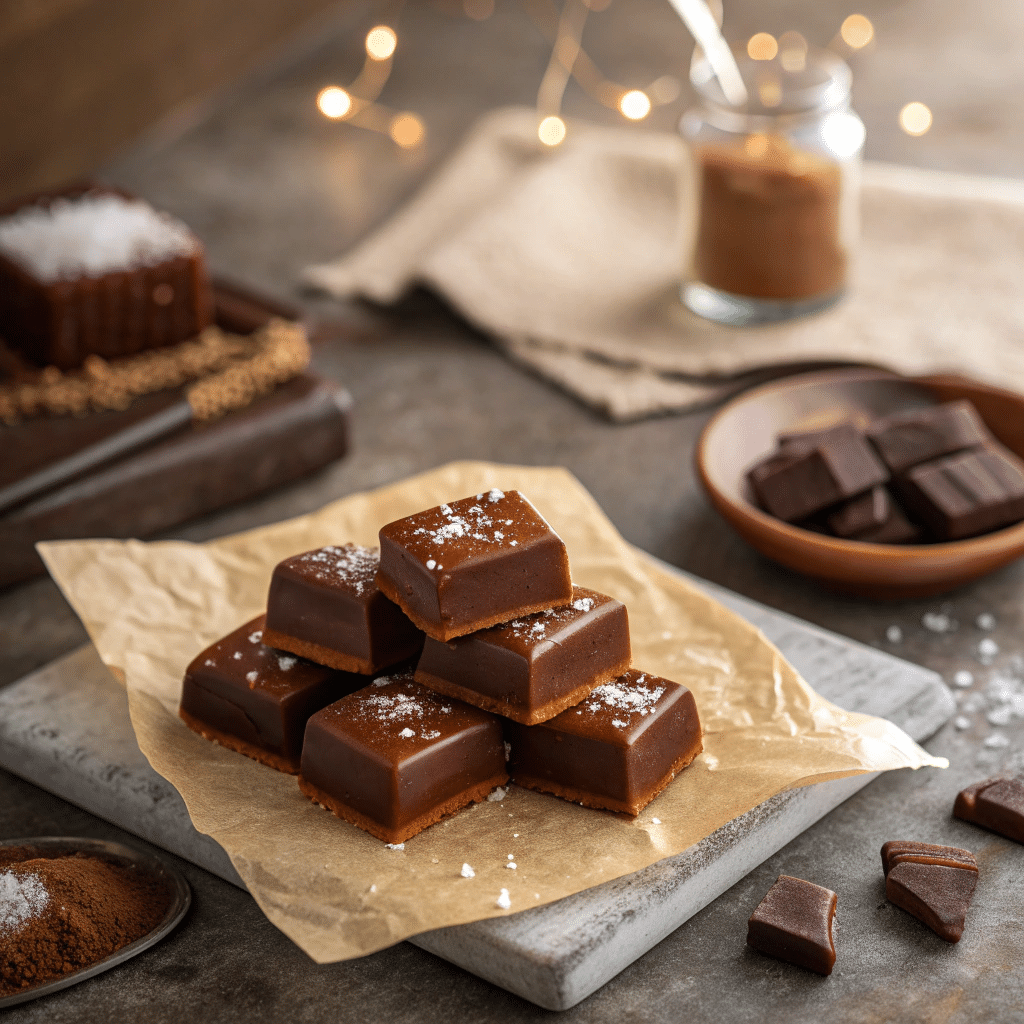
- Sea Salt Chocolate Caramels: Sprinkle flaky sea salt on top immediately after pouring into the pan. The salt cuts the richness and adds an irresistible contrast.
- Spiced Chocolate Caramels: Mix in a pinch of cinnamon, cayenne, or even chili powder for a subtle heat that lingers.
- Nutty Caramels: Stir in ½ cup chopped toasted pecans, almonds, or hazelnuts just before pouring. These add crunch and enhance the earthy notes in the chocolate.
Want to take it even further? Dip the cooled caramel squares halfway into tempered dark chocolate, then place on wax paper to set. This gives you that chocolate-on-chocolate luxury found in high-end candy shops.
Achieving the perfect texture
Chocolate caramels walk a fine line between soft and chewy. Here’s how to land that perfect bite every time:
- Use a thermometer: 245°F is ideal. Go a few degrees lower for softer caramels (around 240°F), or a few higher (248°F) for a firmer chew.
- Stir gently and evenly: Aggressive stirring can create air bubbles and a grainy finish. Stir only until the mixture is smooth and sugar is dissolved.
- Avoid overcooking chocolate: If using chopped chocolate instead of cocoa powder, add it after removing the pan from the heat to prevent burning or bitterness.
- Cool completely before cutting: Warm caramels may stick or fall apart. Let them rest a full 3–4 hours or chill for 30 minutes before slicing.
Proper technique will ensure your caramels stay silky and smooth — never greasy or gritty. Wrap each one in wax paper to preserve the texture and give them that nostalgic candy-shop look.
FAQ – Chocolate Caramels
1. Can I use dark chocolate instead of cocoa powder?
No, this recipe is designed for unsweetened cocoa. Melted chocolate can alter the texture and setting point.
2. Why did my caramel turn grainy?
Stirring sugar while it boils or not fully dissolving it at the start can cause crystallization. Let it bubble undisturbed.
3. Do I need a candy thermometer?
It’s highly recommended. But you can test the mixture by dropping a bit into cold water—it should form a firm, pliable ball.
4. How long do they last?
Up to 2 weeks at room temp, 3 months if frozen in an airtight container.
Conclusion
These Chocolate Caramels strike the perfect balance between rich cocoa indulgence and that classic buttery chew. Whether you’re wrapping them for the holidays or keeping a stash for yourself, they’re guaranteed to satisfy every chocolate craving. With minimal ingredients and maximum payoff, this is one recipe every sweet tooth should master.
Looking for more sweet creations? Check out our homemade candy recipes for seasonal treats and everyday indulgence.


